How to Show Uploading Percents in Arduino When Oploading Code Ota
Uploading Arduino Code Wirelessly – OTA
Fourth dimension Needed : 00 hours 10 minutes
Arduino OTA Code Upload – In this Arduino Tutorial, yous will learn how to upload code wirelessly to Arduino Board.
- Create a "Thing"
- Adding Arduino Board
- Add Variables
- Configure Network
- Coding – Preparing Lath for OTA
- Coding – Uploading Arduino Code Over the Air
Materials
- Arduino Nano 33 IoT, PC, USB Cable
Welcome back to another tutorial from RootSaid. In this mail, I'll exist showing y'all how you can upload a code Over the Air to your WiFi-enabled Arduino lath – Arduino OTA Code Upload, without using whatsoever USB cable.
What is Arduino OTA Code Upload?
Before going further, let's take a moment and understand Arduino OTA Code upload. Ordinarily, what will you do when you want to upload/update a lawmaking running in your Arduino Board of your Robot or your Smart Home system? Well-nigh of the fourth dimension, we will have to plow off the whole organisation, disconnect the lath from the PCB or breadboard, bring it closer to your laptop or your mobile phone, connect your Arduino Board to your PC, upload the lawmaking and button it dorsum to the PCB. What if you could upload the lawmaking without doing any of that?
Arduino OTA Lawmaking Upload is a new feature that enables yous to upload or update a new lawmaking to your projection without even connecting the board to your PC.
How does Arduino Wireless Coding Works?
First, nosotros will create an account, create a project in Arduino IoT Cloud, add our Arduino Board, and link it to the projection. Nosotros will too configure the WiFi network through which this board will be communicating with the IoT Cloud. In one case it is done, we will use the Arduino Online Sketch editor to write our programme. The first program will comprise codes to connect back to the Arduino IoT server and keep the board updated with the cloud. This will too enable the Arduino OTA Upload feature in the sketch editor. Once it is washed, we tin can select the Over the Air option from the editor and click on upload.
What happens during Wireless Code Upload?
When nosotros click upload with OTA Selected, the sketch is first compiled depending on the type of board that is linked to 'Thing'. The compiled sketch is stored in an AWS S3 bucket. For those who are non aware of the S3 saucepan, it is an online cloud service past Amazon where nosotros tin can store files. At the aforementioned time, the target device is associated with the OTA file URL. And then, certain flags are set to logic that will initiate the board to start downloading the file that is stored in S3. Once the file is verified, the code is flashed. Get more details well-nigh Arduino Over the Air code upload from here.
Arduino OTA Lawmaking Upload Video Tutorial
If yous are a beginner and yous're totally interested in building your own robots and electronic projects then this channel is for you lot.
My name is Jithin and I'one thousand super excited to teach you everything y'all need to know virtually what you need to know. So let'south upload the first sketch Over the Air.
Steps to Upload Arduino Code OTA
Footstep 1 – Uploading Arduino Code Wirelessly- Creating a Matter
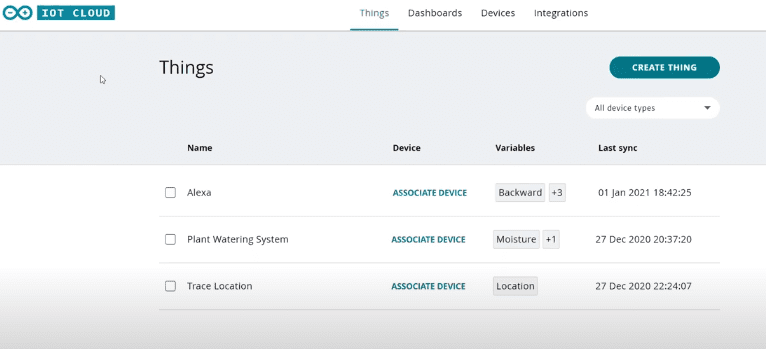
For that, the first thing you accept to do is you have to create an account in Arduino IoT Deject and sign into it. Once you take signed in you should be able to run into all the things created by y'all. As you tin run into here I accept created three things earlier.
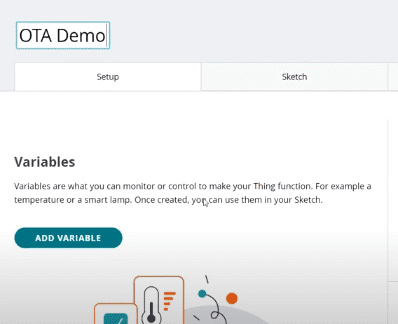
A matter is like a project. For this project, I'll be creating a new thing. To do that click on create thing and give it a proper name. Let'southward proper name it OTA demo.
Step 2 – Adding Arduino Board
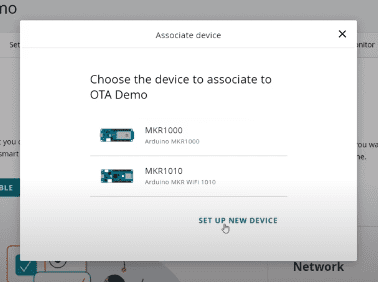
The next thing you have to do is, you take to link a lath to this project.
To do that click on the select device and since we'll be calculation Arduino Nano 33 IoT, which is not in the device list, click on Setup > New Device > Gear up an Arduino device.
At this point, you have to make sure that your Arduino Nano 33 IoT is connected to your PC and Arduino Create Amanuensis is running on your PC.
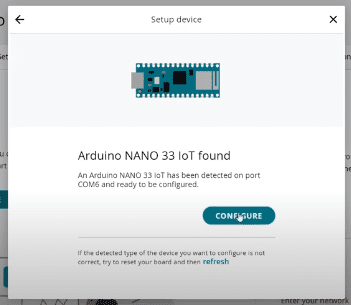
As you tin see here, Arduino Nano 33 IoT has been detected by an Arduino Create Agent. Now to configure that click on configure and requite information technology a name. Click on next.
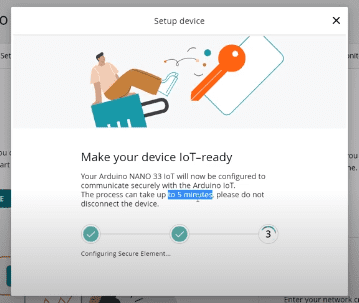
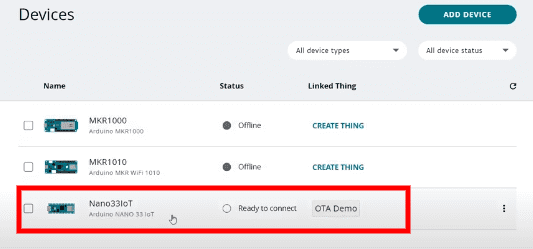
At present, a lawmaking will be uploaded to your board and volition be configured for you. Information technology will have upwardly to five minutes. But it took only one minute for me. Now Arduino Nano 33 IoT has been added to our device list. Now click on done and go to devices. You should see nano 33 IoT with status ready to connect.
Pace three – Adding Variables
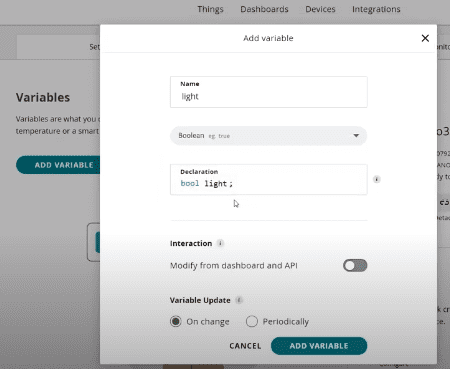
Now become back to things and click on OTA demo. In that location if you desire yous can add together variables. To add variables, click on add variable and give your variable a name, prepare variable type, and click on add together variable. Yous should run into your variable inside your thing configurations.
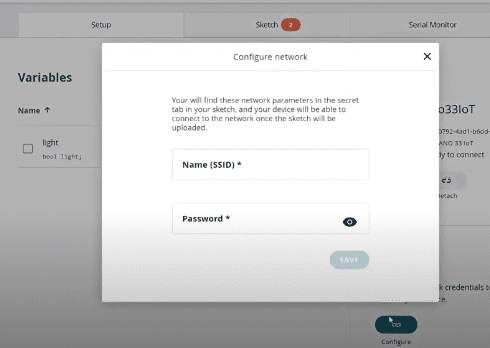
Step 4 – Setting Up WiFi
Now to set up WiFi, you have to click configure under Network. In that location you have to provide your WiFi name (SSID) and password. At present click on save and you are done. It's fourth dimension for coding.
Step 5 – Coding
You can directly away go to sketch. The all-time thing about Arduino IoT Cloud is they will generate a sample sketch that contains all the disquisitional variables and functions which are needed to run the lawmaking. At present all you take to practise is add the extra variables and the functions.
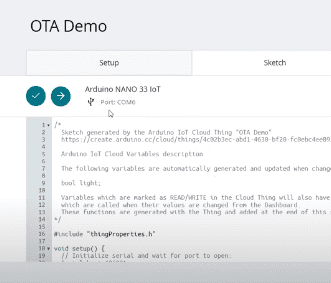
Preparing Code for OTA Upload
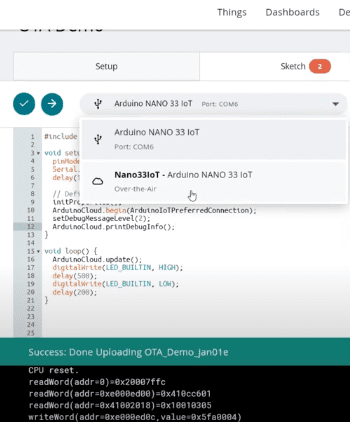
If you await hither, you lot can see that Arduino Nano 33 IoT is connected to port COM vi of our PC.
So guys here is the blink sketch. According to this code, the born led will turn on for one 2nd and plough off for one second and will echo the code. That means it will blink once every second. Now click on upload. At this betoken, we are uploading the code to the board via port COM 6; that means we are uploading the lawmaking through a USB cablevision.
At present if you lot accept a look at the board you can see that the led is blinking once every 2nd.
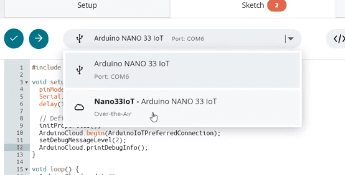
Uploading Arduino Lawmaking Over the Air
Now we volition slightly modify the lawmaking. Allow'southward alter the filibuster, let's change it to 500 and 200. Now if y'all take a look at ports available, y'all can encounter that 1 more than option is available to upload the code to your board; that is the Over the Air selection. Now simply select Over the Air and click on upload. Code upload has been started but it will take a petty bit more time than wired upload.
Once the lawmaking is uploaded yous should see the blinking frequency has changed. That's how you upload the code Over the Air to your Arduino board. Once this option is available you lot no longer take to connect your board to your PC using a USB cable you can upload the lawmaking wirelessly.
Get more details nearly Arduino Over the Air code upload from here.
blanchardowbet1987.blogspot.com
Source: https://rootsaid.com/arduino-ota-wireless-code-upload/
0 Response to "How to Show Uploading Percents in Arduino When Oploading Code Ota"
Publicar un comentario